Friday, April 22, 2016

Crochet Chevron Blanket

I saw this Bold & Bright Chevron Blanket by Stephanie at allaboutami.com and really wanted to make one! I have made a Crochet Chevron Baby Blanket before for my son but the was more wavy.

I love the colors that Stephanie used but I really wanted to try what I had in hand. I wasn't sure what I was going to do with them (as far as putting it together) but in the end I decided to use the grey (Putty) color in between the Coral and Teal (Paradise) colors. I honestly don't know how many skeins I went through. Each Coral and Paradise color was 6 double crochets and used less than one skein. Each Putty color was 3 double crochets and I used a little less than 1 for 2 of those. These are Red Heart's Accent skeins and they're a little smaller so it's a little cheaper.


If you know me, you know I don't like large projects. I have no patience :) So, I started on a weekend and worked on it every chance I got. I would work on it while the kids played outside. While laying with my baby at night so he can fall asleep and watching TV after they went to bed...

I brought it to work and worked on it during breaks and lunch (until it got larger and it was just a pain to bring back and forth. I was actually surprised how quickly it worked up. I guess that's why double crochet stitches are my favorite.


Monday, April 11, 2016

Crochet Shark Hat


Tomorrow is "Silly hat" day at my son's preschool and of course I forgot. I had to make a run to the store at lunch to get the yarn I needed. 

I found a free pattern from Repeat Crafter Me. I actually only followed the teeth and fin portion which is why I forgot to complete it with the single crochet before adding the teeth! UGH. Oh well. I added it after the fact.

Still, the free pattern is great since it gives you different options for sizing. The main reason why I didn't follow it is because I'm already used to the sizing for my kids...


Tuesday, April 5, 2016

Crochet Baby Shell Bonnet


I followed the video tutorial from WoolyWondersCrochet except I used different size hook and yarn and  I added a couple of single crochets to the bottom of the hat to add a bit of a border.


Monday, April 4, 2016

Crochet Sun Hat Pattern

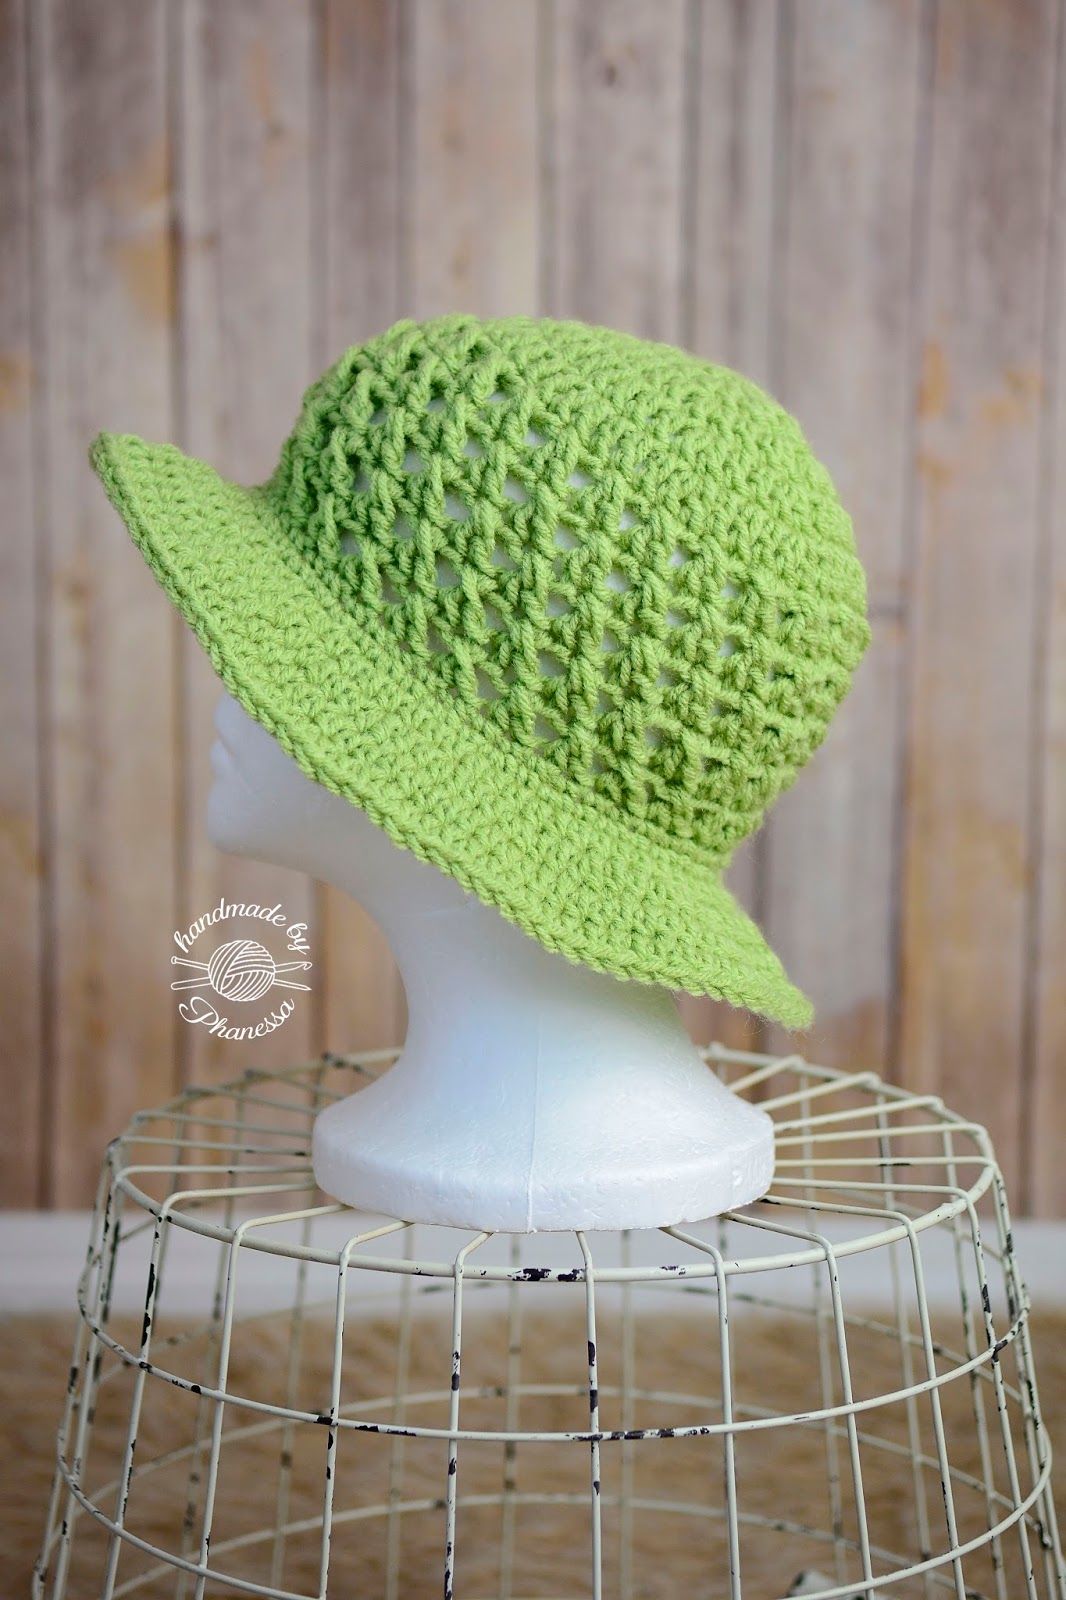
I wanted to make a cool comfy hat for my boys when they're out in the yard playing, specifically, my oldest who has been out growing all the hats and passing it down to his little brothers.

The first green hat I made actually turned out too big and so I made him a smaller one using camo yarn. I think it's a much better fit for him anyway.

The pattern is for the adult size.

SUPPLIES:

Red Heart Yarn in Guava (adult) - Camouflage (child)
6.5mm Crochet Hook
Scissors
Yarn Needle

ABBREVIATIONS

ch - chain
sl st - slip stitch
sc - single crochet
hdc - half double crochet
dc - double crochet
sk st - skip stitch

PATTERN:

Starting with a magic ring, chain 2 (does not count as a dc), 

Round 1: 10 dc into magic ring, sl st into top of 1st dc, ch 2

Round 2: 2 dc into the same stitch, *2 dc into the next stitch, Repeat from * all the way around. sl st into the top of the first dc. ch 2.

Round 3: 1 dc into the same stitch, *2 dc into the next stitch, 1 dc into the next stitch, Repeat from * all the way around. sl st into the top of the first dc. ch 2.

Round 4: 1 dc into the same stitch, 1 dc into the next stitch, *2 dc into the next stitch, 1 dc into the next 2 stitches, Repeat from * all the way around. sl st into the top of the first dc. ch 2.

skip round 5 for child size hat
Round 5: 1 dc into the same stitch, 1 dc into the next 2 stitches, *2 dc into the next stitch, 1 dc into the next 3 stitches, Repeat from * all the way around. sl st into the top of the first dc. 

Start of cross stitches: Adult is 5 rounds and child is 4 rounds

Round 6-10: ch 3 (counts as the first double crochet stitch from here on out), 
dc into the last stitch (going to the right side crossing the ch 3 & dc stitches).


Skip the next stitch and dc into the next stitch (moving to the left direction now)
Go back to the sk st and dc into that stitch


You will repeat this all the way around (sk st, 1 dc into next, go back and 1 dc into sk st)


sl st into the top of the chain 3.


BRIM:

Round 1: ch 1, sc into same stitch, 1 sc in each stitch all the way around, sl st into top of first sc

Round 2: (increase) ch 1, sc into the same stitch *2 sc into the next stitch, 1 sc into the next stitch, Repeat from * all the way around. sl st into the top of the first sc

Round 3: ch 2, hdc into same stitch, 1 hdc in each stitch all the way around, sl st into top of first hdc

Round 4: (increase) ch 2, hdc into the next 2 stitches *2 hdc into the next stitch, 1 hdc into the next 2 stitches, Repeat from * all the way around. sl st into the top of the first hdc

Round 5: Repeat round 3

Round 6: (increase) ch 2, hdc into the next 3 stitches *2 hdc into the next stitch, 1 hdc into the next 3 stitches, Repeat from * all the way around. sl st into the top of the first hdc

If you would like to make a larger brim, repeat round 3 and increase in the next round (2 hdc into every 5th stitch since you increased every 4th stitch in round 6). 

Fasten off and weave in all ends. 


For this Cranberry (Red Heart Yarn) hat, 
I added more rows to the brim to make it wider for me.


Sunday, April 3, 2016

DIY Polymer Crochet Hook


When I want to do something, there's no stopping me! ;) Instead of buying something I want, I spend more than I should to make it! Of course, in the end (if I continue to make more) it will be a lot more cost effective since I won't need to buy a lot of the tools and supplies....

So, first you need clay (duh) so I purchased a few in different colors and a multi pack.

SUPPLIES

Polymer Clay
Crochet Hook - Mine was 5mm
Acrylic Roller 
Non-stick mat
Cutting Blade (X-acto Knife)
Metal cutters (optional)


INSTRUCTIONS

I rolled the the clay first so it's easier to knead. I used my fingers to squish until the clay is soft.

I rolled 2 different size balls (3 sections total) of the white clay.

I insert from the bottom the smaller ball and then the larger ball. 

From here I shaped it until I got the desired look.

I covered the bottom of the hook.

I rolled a thin piece of pink clay and placed it between the two balls.

I cut out little hearts (only using two) and decorated with it.


I then baked it at 275°  for about 25-30 minutes. It says 15 mins per 6mm (1/4") thickness. I have no idea how thick mine is. 

I used the Triple Thick Glaze after it cooled. 

It's only my 2nd hook made using polymer clay. I later read that all the smoothing and buffing should be done before baking... so I'm still learning. It's not perfect but I still love it :) I can see this getting really addicting! Yikes!

The plain pink one was the very first one I made, and I didn't glaze it. I used it to make something and it was a world of a difference with comfort!


Saturday, April 2, 2016

Crochet Scarf - Beginners


This scarf is so easy to make. All you need to know is how to do a slip knot, chain stitch, slip stitch and single crochet.

I started this crochet365 thing on instagram just to see if I can get through a month. I used to participate in the photography projects monthly too but as you can see, I have way too many things I want to do!

Tomorrow's theme is "Tweed" and so I wanted to make something out of the Aspen Tweed yarn from Lion Brand's Hometown Chunky Yarn.

SUPPLIES:

Aspen Tweed Yarn 
10mm Crochet Hook
Yarn Needle
Scissors

PATTERN:

1) Start with a slip knot


2) Start your chain stitch. I chained until I ran out of yarn. Chain loosely. 

I had leftover from another skein I planned to use. If you only have one skein, I suggest making the piece (step #5) that wraps around the scarf first and then using the rest for the scarf.


3) Slip stitch to the beginning of the chain stitch.


4) Tie knots to secure the ends.


5) To make the piece to wrap around the scarf, do a slip knot and then chain 8


6) Single crochet into the 2nd chain from the hook (Insert hook into stitch, yarn over, pull through, yarn over and pull through 2 loops on hook.) Single crochet all the way to the end, chain 1 & turn.


7) Single crochet back to the other end... you will repeat this until your piece measures about 5 inches.


8) Decide how you want the scarf on your neck, mine was about 18"


9) Wrap piece around scarf where the knot is. Slip stitch across to join.


10) cut ends and turn the piece inside out so that the seam is on the inside. When I weaved the ends in, I weaved it through the scarf hoping to secure it more. 

Adding buttons is also cute but I decided to add my wooden branding tag.

Crochet Lulu Pom Pom Scarf

Let's face it. Kids things are cute. They're miniature and the kiddos look good modeling anything! Anyone who knows me knows ...